Amazing iPad Teleprompter With Voice Controlled Text Scrolling
IPad Teleprompter
$295 a day
$885 a week
Available for pick up in Manhattan and Hollywood
Amazing iPad Teleprompter With Voice Controlled Text Scrolling
Works wirelessly with SteadiCam/Ronin
Pro Version 13″ Hi Brite Monitor $295 Day / $885 Week
Get in touch
-
Modular System for 6″-12″ Mobile Devices
15 ft Reading Range
60/40 Beamsplitter Glass
Carbon Fiber Rods
Includes PC / Mac Prompter Software
150mm Lens Openings
Tooless Assembly
Folds Flat for Transport and Storage
Weighs 6 lb
-
Scripts or digital notecards functions
Voicetrack proprietary voice recognition technology
Additional Scroll Options
Custom Formatting to Match Your Preferences
Special Features To Guide You Through Your Speech
Digital Notecards For Delivering Less Structured Speeches
Document Editing Within Promptsmart
Video/Audio Record Your Speeches And Share With Others
Import Files From The Cloud In Multiple Formats
iPad Teleprompter : STEPS IN INSTALLATION

STEP 1: INSTALL THE REAR CAMERA BRACKET
Place the center piece on a stable and secure surface in order to attach the following parts.
Remove the blue thumbscrews located on the bracket on the rear prompter rails. Fit the camera bracket onto the rail bracket with your preferred camera height facing forward. Re-insert and tighten the blue thumbscrews to secure.

STEP 2: ADJUST THE FRONT TABLE BRACKET
Use the knob underneath the front tablet bracket to loosen the front bracket. Slide the tablet bracket to your desired position and re-tighten the bracket knob.

STEP 3: INSTALL THE GLASS AND FRAME
Remove the two blue thumbscrews on the glass frame bracket located in the middle of the chassis. Slide the glass frame into the glass bracket and line up the screw holes. Re-insert and tighten the blue thumbscrews to secure the glass and frame.
Adjust the angle of the glass to your desired position by turning the large blue knob located on the front of the glass bracket.

STEP 4: ATTACH THE SUN VISOR (OPTIONAL)
Place the sun visor onto the glass frame by lining up the Velcro strips (pre-installed on the visor and glass frame.)

STEP 5: ATTACH THE HANDLE GRIP
Thread the included handle grip into the screw hole on the bottom side of the center chassis. Tighten to secure.
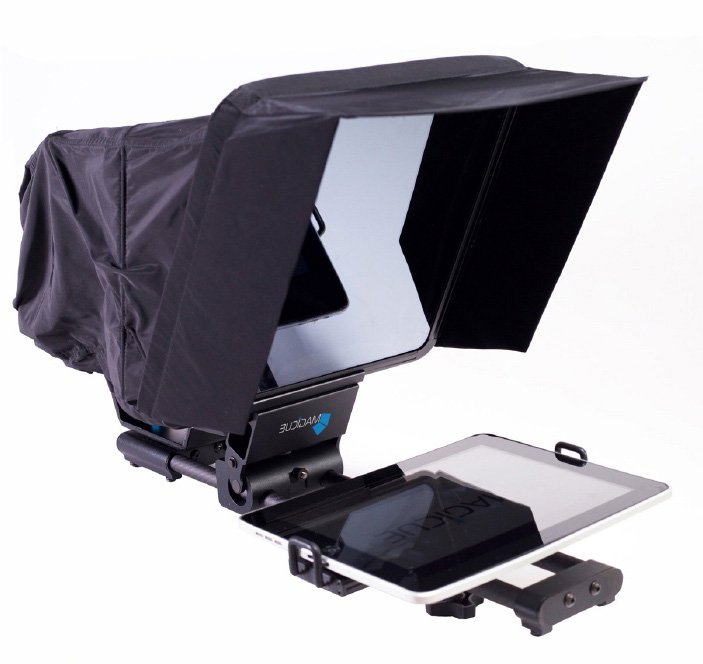
1. What is the iPad Teleprompter, and how does it function?
The iPad Teleprompter is a lightweight, portable prompter system that utilizes your tablet to display scripts directly in front of the camera lens. It employs a 60/40 beamsplitter glass, allowing on-camera talent to read the script while maintaining direct eye contact with the audience. The system supports voice-controlled text scrolling, enabling the script to advance in real-time as the speaker talks, ensuring a natural delivery .
2. What are the key features of the iPad Teleprompter?
Voice-Controlled Scrolling: Utilizes proprietary voice recognition technology to scroll the script in sync with the speaker's voice.
Modular Design: Accommodates mobile devices ranging from 6″ to 12″.
Reading Range: Clear visibility up to 15 feet.
Construction: Carbon fiber rods and tool-less assembly for quick setup.
Portability: Folds flat for easy transport and storage; weighs only 6 lbs.
Compatibility: Includes PC/Mac prompter software and supports 150mm lens openings .
3. How much does it cost to rent the iPad Teleprompter?
The rental rates are:
$295 per day
$885 per week
These rates include the prompter system and necessary software. The equipment is available for pickup in Manhattan and Hollywood .
4. Is the iPad Teleprompter compatible with SteadiCam or Ronin setups?
Yes, the iPad Teleprompter is designed to work wirelessly with SteadiCam and Ronin systems, making it ideal for dynamic shooting environments where mobility is essential .
5. What is the setup process for the iPad Teleprompter?
The setup involves:
Installing the Rear Camera Bracket: Secure the camera bracket onto the rear prompter rails.
Adjusting the Front Tablet Bracket: Position the tablet bracket to accommodate your device.
Installing the Glass and Frame: Insert the beamsplitter glass into the frame and secure it.
Attaching the Sun Visor (Optional): Affix the sun visor using the pre-installed Velcro strips.
Attaching the Handle Grip: Screw the handle grip into the chassis for handheld operation .
6. What software is included with the rental?
The rental includes PC/Mac prompter software that supports voice-controlled scrolling and various formatting options. The software allows for importing scripts from the cloud in multiple formats and provides features like digital notecards and document editing within PromptSmart .
7. Can I use my own tablet with the iPad Teleprompter?
Yes, the modular system is compatible with mobile devices ranging from 6″ to 12″, allowing you to use your own tablet for prompting .
8. Is technical support available during the rental period?
While the iPad Teleprompter is designed for self-operation; technical support is available if needed. Detailed setup instructions are provided to ensure a smooth experience .
9. How can I book the iPad Teleprompter for my production?
To book the iPad Teleprompter, please fill out the contact form with your production details. Our team will get in touch to confirm availability and finalize the booking process.
